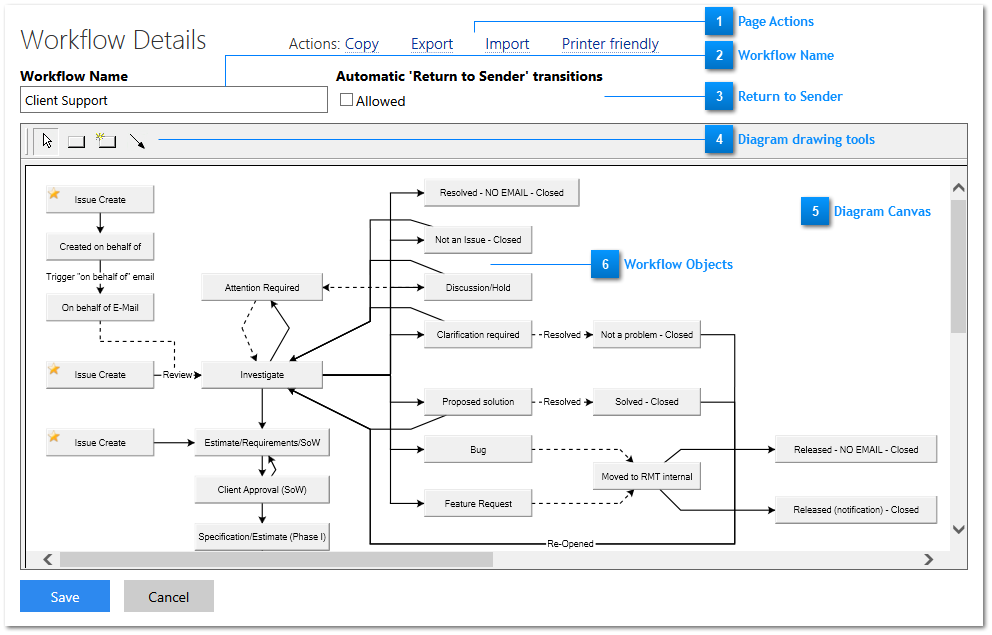
Clicking the Copy… link at the top of the page will copy the existing workflow to a new workflow.
Workflows can be Exported and Imported between RMTrack sites. This is useful when using a test or development site of RMTrack.
NOTE: The groups must match in the two environments when exporting and importing workflows or the import will fail.
Printer friendly will render the diagram image in a format suitable for printing.
Workflow Name
Each workflow must be given a unique name.
Return to Sender
RMTrack workflows can include a Return to Sender option at all resolution states. This means that at ALL resolution states, a user that is able to update the issue has the option of sending the issue back to the previous user and resolution state. This option can be turned off for any workflow by unchecking the box beside the workflow name.
Diagram drawing tools
The first arrow is the selector tool. Use this tool to select objects in the diagram.
The plain rectangle is the tool for drawing resolution states. Select this tool, click on the diagram area and drag to draw a resolution box.
The rectangle with the is the tool for drawing Issue create boxes. Select this tool, click on the diagram area and drag to draw a create issue box.
The last arrow is the tool for drawing transitions. Select this tool, click on an existing box and drag to another box to create a transition.
Diagram Canvas
Position the mouse over the diagram canvas anywhere there is not an object and right-click the mouse to display a context menu for the basic diagram:
The diagram canvas options are:
Show Grid – to display a drawing grid.
Snap to Grid – to aid in positioning objects on the page.
Zoom – to ‘zoom’ in or out on the workflow.
Workflow Objects
There are three objects on the workflow:
Issue Creation - represented on the diagram by a box with a yellow star at the top left.
Resolution State - represented by a regular box on the diagram.
Transitions between resolutions - represented by directional arrows on the diagram
Objects are drawn on the canvas after selecting the appropriate drawing tool (see 5 above) using click and drag.
Objects can be deleted by right-clicking and selecting 'delete' or by selecting the object hitting the 'Delete' key.
When a new object is drawn on the canvas, the properties dialogue box for the object is automatically displayed and must be completed. The properties dialogue can also be displayed by double-clicking on an object or right-clicking and selecting 'Properties'.
Clicking on an object using the selector tool (see 4 above) will select the object.
When a box is selected the size of the box can be changed by using the blue 'handles'.
When an arrow is selected blue dots appear on the arrow. Drag these dots to create a bends in the line.
Selecting an object (or positioning the mouse over an object on the diagram) and right-clicking the mouse, displays a menu specific to that object:
For the boxes the menu options are:
Bring to Front – for overlapping objects.
Send to Back – for overlapping objects.
Delete – to remove the object.
Properties – to display/modify the properties of the resolution state.
For the transition arrows the menu options are:
Reverse Direction – to reverse the direction of the transition arrow.
Direct – straightens the line from one resolution state to the other.
Delete – to remove the object.
Properties – to display/modify the properties of the action.