To create a new installation of RMTrack, download the installation executable from
www.rmtrack.com/downloads and run the program on your application (web) server.
If you are creating a new RMTrack database, it will be initialized with a 15 day trial license key. Once RMTrack is successfully installed you can add a permanent license key from the
Licenses page of the application.
System Prerequisite
RMTrack requires Microsoft .NET Framework 4.8 to be installed. If it is missing, a screen will be displayed informing you of the missing component and allowing you to download and install it automatically.
Welcome Screen
Once the prerequisites have been been installed and other requirements verified, the installer Welcome to the RMTrack Issue Tracking 7.?.?? Setup Wizard will appear. Click Next to proceed.
End-User License Agreement Screen
To proceed with the installation of RMTrack the
EULA must be accepted. By checking
I accept the license agreement and clicking the
Next button you are agreeing to the terms of the agreement.
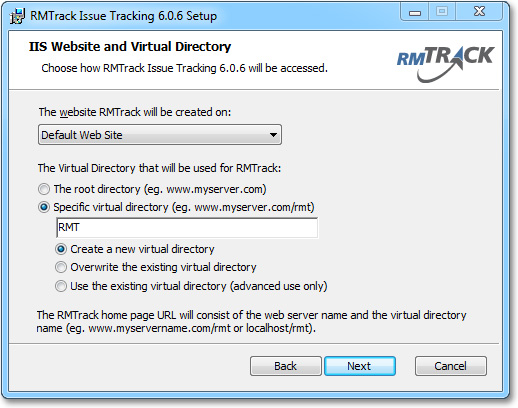
IIS Website and Virtual Directory Screen
Website
The Website and Virtual Directory dialog allows you to select what URL users will use to access RMTrack. Typically a server has only the Default Web Site defined. Some servers may have additional web sites defined, and they will be listed here.
Virtual Directory
The RMTrack virtual directory can either be located at the root level, or as a specific virtual directory.
When installing as a specific virtual directory you will generally want to
create a new virtual directory. The
Overwrite and
Use existing options are generally only required when there is a problem creating a new virtual directory on the server and
support@rmtrack.com is involved.
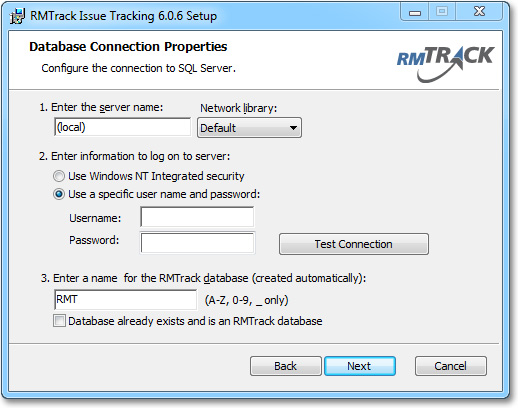
Database Connection Properties Screen
Server and Network Library
The database connection properties allow you to determine how RMTrack will connect to the SQL Server database.
Generally, the Network Library option should be left as Default. This allows the client components of SQL Server to determine how best to connect to the server. Some installations may require using an IP address for the server name and the TCP/IP network library (especially if there is a firewall between the web server and the SQL Server).
Database Logon Credentials
The logon information is used during the installation to create and perform the initial population of the database. After installation, RMTrack will use this same logon information whenever it connects to the SQL Server.
Note that for installation, the SQL logon used must be a member of the SQL Server SysAdmin role. After installation (for application access) the logon only requires either db_owner or db_datareader, db_datawriter, db_ddladmin.
For the integrated
backup and
restore functionality the SQL logon must be a member of the
SysAdmin role.
Database Name
The database name defaults to RMT but can be changed to anything so long as the name only contains letters, digits and underscores. The installation will verify that the name is valid and that a database by that name does not already exist.
If you are connecting to an existing RMTrack database you should mark the Database already exists and is an RMTrack database check box. The installation will verify that the database does exist and is an RMTrack database.
About Integrated Security
The integrated security option is only available if the SQL server and RMTrack are installed on the same server.
A new local user will be created, named IUSR_RMTRACK. This user will be made a member of the Guests groups, given the right to logon as a service. The virtual directory will use the IUSR_RMTRACK user account for anonymous access, and the RMTrack Scheduling Service will run under the IUSR_RMTRACK user id.
Destination Folder Screen
The Destination Folder allows you to pick the location on your server’s hard disk to install the files. The default is acceptable for most customers and is recommended.
|
NOTE: Common support files (.DLL’s etc.) are installed in the C:\Program Files\RMTrack Issue Tracking folder. This folder should not be changed and the application depends upon its existence.
|
Ready to Install Screen
If you’re ready to install, click the Install button to begin the installation. You can also click the Back button to review your choices.
Updating System Screen
RMTrack installation typically takes under two minutes, but this will depend on the speed of your server.
Finished Screen
At this point the RMTrack application is installed and ready for use. After you click the Finish button the RMTrack ReadMe.htm will be displayed in your default browser. Follow the directions in the ReadMe.htm for Quick Start to logon to RMTrack.
NOTE: If the installation fails at any point, or the ReadMe page does not open in your browser after clicking Finish, please contact support@rmtrack.com for assistance.
There will be a LOG file created in the C: directory of the server's hard drive called: RMTrackInstallation.log. Please send that log file to support.
|